2sat

2Sat was my first satellite sculpture. Check out my second - tinysat
Form
The heart of 2Sat is a small pummer circuit.
Solar panels sit on either side of the satellite, and at the base is a large capacitor, which stores the needed energy. The angle of the panels was tricky to decide on, as that changes how the satellite looks. After a bit of playing around, I chose an angle that tilted them at about a 30º angle.
For this sculpture, I used 0.8mm brass wire for the structure, and I’m pleased with the results. The only other key design feature is the blinking LED that extends from the top of the satellite. 2Sat has a total height of ~85mm, with the body + capacitor measuring at 45mm high, and the LED extending 40mm.
Function
The core of this sculpture is a small charging circuit, combined with a pummer circuit.
During the day, the solar cells charge up the capacitor. Then, after dark, the capacitor begins to discharge and power the pummer circuit.
This nocturnal behaviour doesn’t need any extra sensors. Instead, a clever circuit design allows the solar panels to act as both a source of power and a light sensor.
The pummer circuit produces a short pulse which gets smoothed by a 100uF capacitor in parallel with the LED. This is what creates the pumming, blinking effect (there is room for improvement).
The pumming effect is not ideal — with a charged capacitor, the LED doesn’t turn off after flashing. Instead, it dims and remains on for 3-4 seconds.
As the main capacitor discharged, however, the pummer approaches ideal operations.
I would also adjust the resistor across the solar panel. With the current value of 1MΩ, the circuit turns on earlier than I would like.
The circuit diagram below (not mine) shows how to construct this circuit -
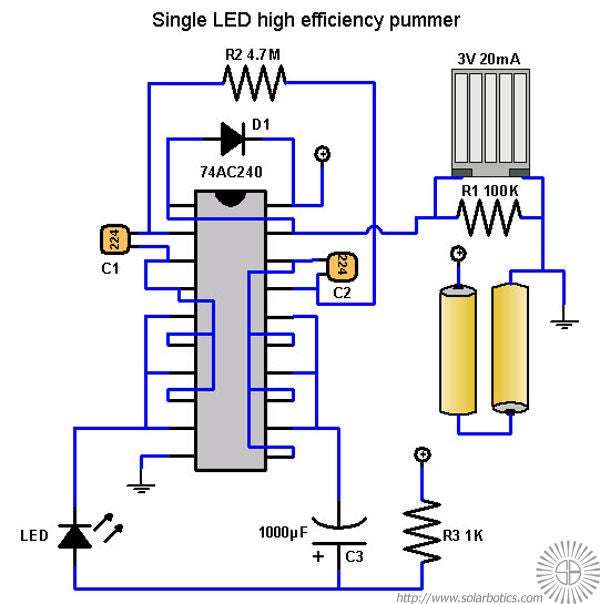
Parts
Key parts for the sculpture were -
- 74HC240 octal buffer / line driver
- 1F 5.5V supercapacitor
- IXYS Monocrystalline solar cells - 86mW - (link)
- Resistors, capacitors, schottky diode, LED
Gallery

