Making a DIY beeswax and oil wood finish (board butter)
In this article:
In this short article, I show you how to make your own “board butter”, a food-safe finish for cutting boards made from natural oil and beeswax. Once you’ve assembled your ingredients, it takes less than 10 minutes to make.
I’ve built a few cutting boards for friends and family recently, and I needed something to finish them with. A common finish is “board butter”, a gel-like mixture of a food-safe oil mixed with beeswax.
The premise behind “board butter” is simple — the oil component gets absorbed by the wood fibres for a deep layer of protection, while the beeswax seals the surface with a protective coating. Together, they should take good care of your cutting board.
You can purchase “board butter” from most hardware stores, but I decided to have a go at making it myself. As it turns out, “board butter” is easy to make, and much more affordable than purchasing it pre-made from a store. I wanted to share my process & ingredients with you in this article. Let’s dive in!
Ingredients for your board butter
You don’t need much to create board butter, just a container, beeswax and oil. Crucially, I’ve found a 1:4 beeswax-to-oil ratio works great — it gives you a spreadable consistency that absorbs well and deposits a solid waxy barrier. There are other articles that also advocate for a 1:4 ratio.
Adjust the following quantities of oil and beeswax to suit your needs; I’ve found this is enough to apply a single coat of finish to ~4 A4-sized cutting boards:
- 52ml food-safe oil (ie: Danish oil)
- 13g beeswax
- 1x airtight glass jar/container for storage
A note on ‘food-safe oil’: defining exactly which oils are ‘food-safe’ can be quite challenging! In most cases, “food-safe” is just a matter of waiting until your oil/finish is fully cured before using your cutting board, but you should do your own research into oils. Mineral oil, tung oil and Scandinavian/Danish oil are all commonly considered “food-safe” once fully cured.
Making your board butter
The process of actually making your board butter is simple too. Here’s what worked well for me:
- Break your beeswax into small chunks (ignore if you’re using pellets) and place them into your glass jar.
- Place your glass jar into a simmering pot of water on your stove to melt the beeswax within. Make sure the water isn’t too hot, the water level isn’t too high and that water doesn’t enter the jar.
- After a few minutes, the beeswax should be fully melted — take it out of the simmering pot and set it aside for ~30 seconds to cool slightly.
- Pour in your oil and stir to combine. Since the jar and wax are both still very warm, the mixture will be very runny at this stage. Place the lid over the top of your jar (but don’t seal it! sealing hot jars is a bad idea) and let it cool down.
- After about 20-30 minutes, your board butter is ready to apply!
If everything goes smoothly, you’ll have a faintly sweet-smelling gel that you can work into a wooden cutting board:
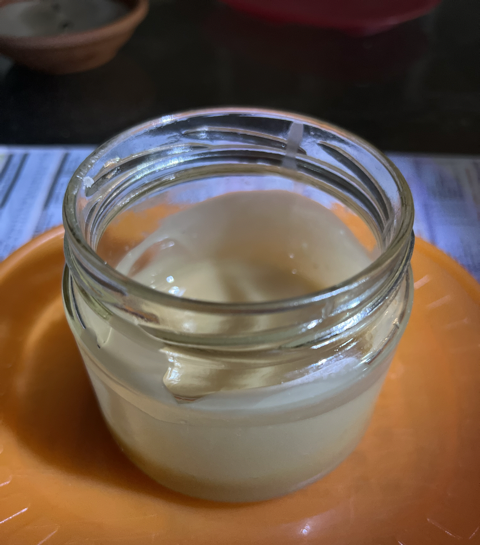 A small jar of home-made “board butter” for your cutting board, made from beeswax and danish oil.
As your board butter continues to cool down, it will continue to firm up. If you live in a colder environment, you might need to warm it up before applying it — placing it in the corner of a warm room for 30-60 minutes should do the trick.
Applying your board butter
The main thing to aim for when applying your board butter is warmth — it’s much easier to apply when the board butter and your cutting board are relatively warm. The board butter will become pliable at quite a low temperature, so leaving both the board butter and cutting board in a warm room or the sun should do it.
Once you’re ready to apply, just scoop a bit out of your jar and use a rag to work it into your cutting board. You’ll know you’ve nailed the temperature if it’s easy to spread and readily absorbed into your cutting board’s fibres.
I like to leave it for at least 24 hours to absorb, then blow it with a hairdryer to warm up the wax as I buff the board with a lint-free cloth. Here’s what one of my cutting boards looked like with the board butter applied, but before buffing (notice the streaks of wax):
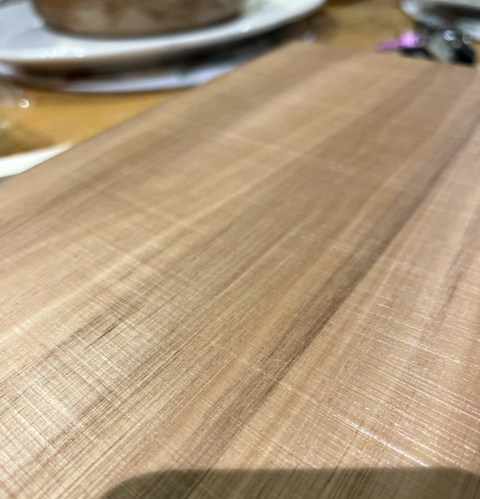 Cutting board with some “board butter” applied, but not yet buffed.
After buffing, you should be able to get your cutting board super shiny and smooth out all those streaks.